Advanced
Network Mode
OtO allows you to synchronize multiple computers. This provides added security during your session, as you can seamlessly switch to another machine if one fails.
You may also connect the OtOView app to OtO, allowing you to display the teleprompter screen over the network, either wired or wirelessly, on a smartphone or tablet.
You can also set up, for example, a multi-screen display system (for a speaker/lectern/presidential prompter, for instance) using two OtO computers dedicated to display on these screens. Simply launch OtO, connect them to the 'master,' then activate the prompter window and switch it to full screen. Even if these computers only have a single display, being able to set the prompter window to full screen allows you to transform an OtO client into a remote prompter display!
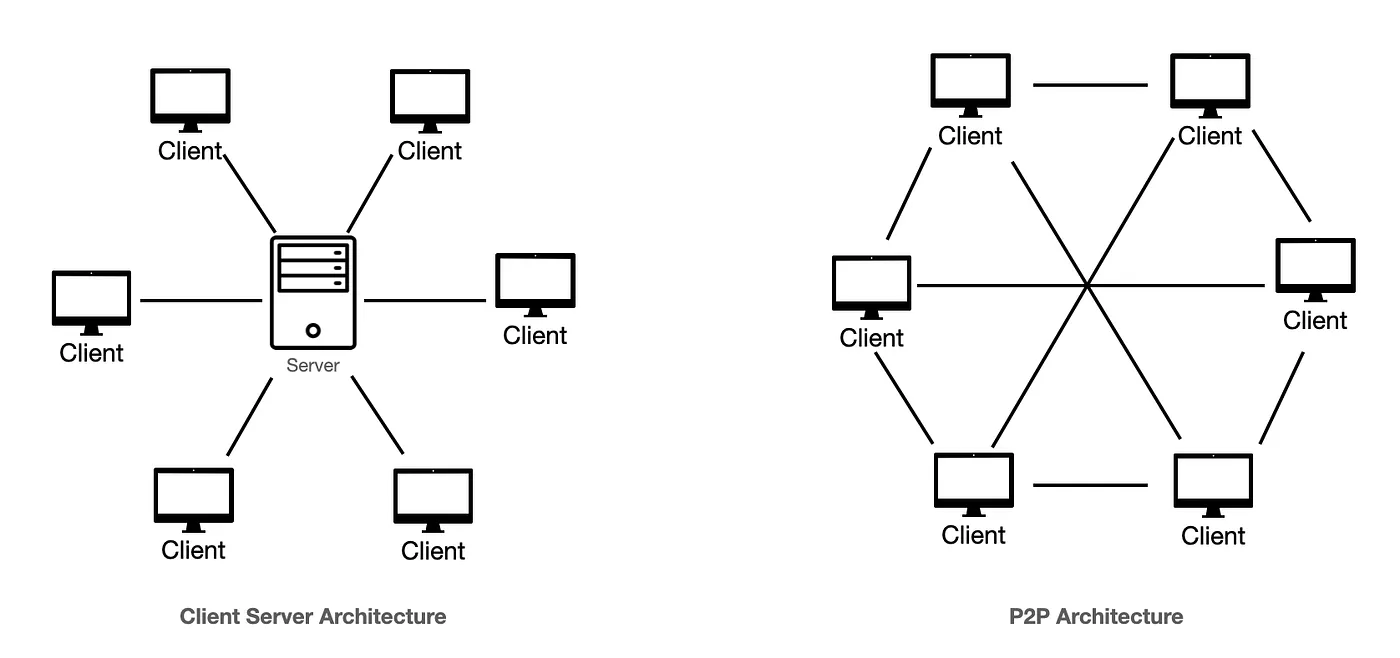
Unlike other presentation or teleprompter software, OtO operates in a peer-to-peer (P2P) mode rather than a client-server setup. All computers are interconnected directly, without relying on a server.
Advantages of Peer-to-Peer Architecture:
- Increased Security: The risk of failure is distributed across all connected machines, unlike in client-server architecture, where a server failure could take down the entire system.
- Ease of Use: It’s simpler to set up and less cumbersome in terms of cabling and devices, speeding up the deployment process.

Required Hardware
- At least two computers that meet OtO's minimum system requirements
- All computers should run the same operating system (either MacOS or Windows) and have matching screen resolution across all computers
- All computers must be connected to the same network
- Display: when prompting in network mode, you'll either need:
- a video switch, HDMI, or other types of switches to toggle the teleprompter display when switching from one computer to another. Here are a few examples of robust and professional-grade HDMI and SDI switches (Blackmagic Design ATEM Mini Pro, Roland V-1HD HD Video Switcher, AJA KUMO 1616 SDI Router or Decimator Design DMON-QUAD for instance)
- or a connected android display with OtOView installed if you want to go wireless
- One or more other connected OtO computers acting as standalone displays by setting their prompter external window in fullscreen (AIO PCs are quite good candidates for this job)
Master and Leading Computers
Master Computer
Although OtO’s peer-to-peer architecture doesn’t rely on a server, the concept of a Master Computer still exists. The master computer acts like a traffic controller: the other computers (the client computers) connect to it and receive the necessary information to establish the OtO peer-to-peer network. Once all computers are connected, the network becomes fully peer-to-peer, meaning even the master can fail without disrupting the network. Follow the guide below to understand how to set up your computer as a master or client computer, and establish a network connection.
Unlock the UI
Once the connection between the master and client computers is established, all computers share the same document with the same scroll position. If you scroll the document on one computer, all others will scroll to the same position. Similarly, if you make a modification from any computer, it will be reflected on all others.
However, please note that by default, all client computers have their interface locked to prevent accidental changes, especially when you use the network mode to bypass potential failures rather than for a fully collaborative environment.
You can unlock the interface of the client computers at any time by clicking the network icon , then selecting Unlock UI, effectively transforming OtO in a collaborative presentation / teleprompter software!
Leading computer
Finally, if you are using Action Markers, please note that only one computer should trigger them (otherwise, an Action Marker that moves to the next slide in a PowerPoint would be triggered as many times as there are connected computers, which is not the desired result!).
This is where the concept of a "leading" computer comes into play.
You can choose at any time which computer will trigger these actions by clicking the network icon and then selecting Take over.
Activating the Network

Activating network mode is simple but must imperatively be done in the correct order:
- Ensure all computers are connected to the same network.
- In the network settings (
⚙ Settings→Network), activate the network option ("Enable OtO Network"), and note the displayed IP address. - If this is the main (master) computer, check the option "Set this computer as OtO Network Master"; if it's a client, leave this unchecked.
- For client computers, enter the master computer's IP address in the OtO Master URL field.
- Save your changes. Your documents are now synchronized!.
- Prompt and edit from the master computer—clients will automatically sync.
- To set a computer to leading mode, click the network icon in the navigation bar and choose "Take over" from the dropdown menu.
Network Status

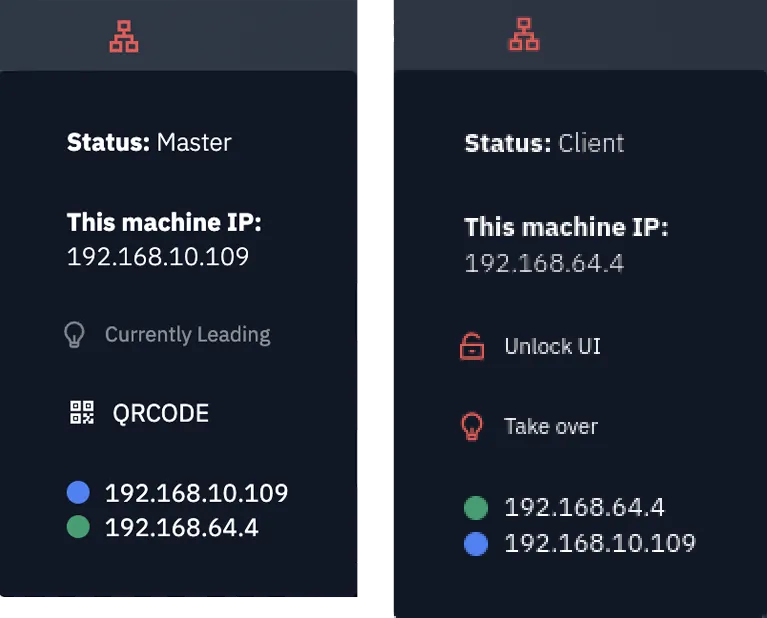
To access the network status dropdown, click the icon in the toolbar
The "Status" line shows whether the computer is a master or client.
The Take over / Currently leading button allows you to set the current computer to a Leading computer. As there can be only one leading computer, this will effectively toggle off the leading mode of the other computer, and the button becomes inactive, displaying "Currently leading."
The "This machine IP" line shows your machine's IP address.
On the master computer, the QRCODE button generates a QR code. Scan it with the OtOView mobile app to turn any smartphone or tablet into a teleprompter display.
Finally, you'll find a list of all connected peers with their statuses explained below:
OtOView
OtOView is an android mobile app developed specifically for OtO. Simple to use, it allows you to connect a tablet or smartphone (or even several devices!) to an OtO "master" computer that controls the scrolling of the text. This enables two main use cases:
- Allows a speaker with a tablet or smartphone to move freely on stage or in a studio without having to rely solely on a camera prompter or speaker prompter.
- Use a tablet as a wireless camera prompter screen.
How to use OtOView:
- Set up an OtO computer as the network "master".
- Download the app from the Google PlayStore (it will soon be available for Apple tablets and smartphones).
- Ensure the tablet or smartphone is connected to the same Wi-Fi network.
- From OtO’s network menu of the Master computer click on the button QRCODE .
- Scan this QRCode from the mobile app by clicking on + then on .
- You’re connected, and the device will now appear in the list of network devices.
- Repeat the procedure to connect other phones or tablets.

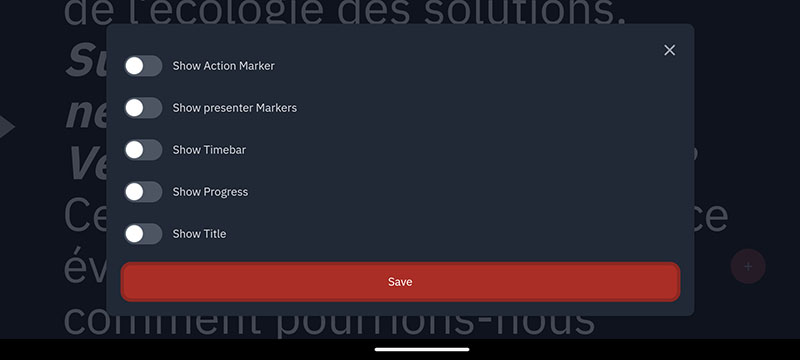
OtOView Options
- By clicking on + and then on , you access options to show or hide specific information.

Troubleshooting
- Most network connection issues arise from incorrect connection order. Be sure to follow the steps outlined above.
- Note that some connected computers or mobile devices may not immediately appear as offline after exiting or if the app crashes.
- It's recommended not to connect more than roughly a dozen of devices (mobiles and computers combined) at once. OtO’s serverless network architecture requires a full mesh topology, which could cause issues if too many machines are interconnected.
Also, take a look at the faq section