Oto Basics
Editing text
OtO simplifies the process of editing and managing text for prompter / cued presentations, allowing you to efficiently import, format, and control documents with ease. Whether you're importing content from a .docX file or fine-tuning the formatting within the editor, OtO provides a flexible and intuitive interface designed for professional use.
In the following chapters, you'll learn how to import and edit documents, adjust formatting, use prompter mode, and work with markers—all essential skills for mastering OtO's text-editing features. Let's dive in!
Importing Documents
- OtO can import any .docX file. To do so, Either click on the toolbar icon or click on the File then "Import docX" menu.
- You can also Copy → Paste text content from any third-party software though we strongly suggest the .docX import way (less prone to formatting issues)
- You can select and open multiple files at once, they will appear in the Rundown / Document list panel 3 .
- To save your new project, just click on the toolbar icon or click on the File then "save" or "save as"` shortcut item and enter a name for your project, it will create a file with a .prompt extension at the selected location.
- You can also import a project within an existing project by cliking on File menu then "Import project" menu item, which will basically merge the imported project with your current project.
You may also use keyboard shortcuts(click on the File menu to see the shortcut for some of the above commands)
Editing Documents
OtO offers basic text processing features, such as bold, italic, colors, and highlighting, as well as font size and font family selection . Simply select the text you want to format and click the corresponding button on the toolbar.

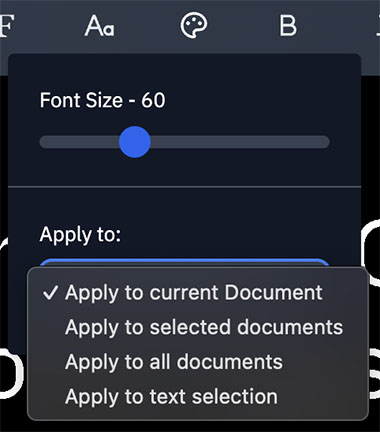
When it comes to font selection , and font size , OtO takes a slightly different approach compared to traditional word processors to better suit the needs of teleprompter presentations. By default, changes made in either of these menus will apply to the entire current document.
You can modify this behavior by using the "Apply to" dropdown in the font or size selection menu, where you can choose to apply changes to selected documents (use the rundown 3b panel checkboxes to select multiple documents), all documents, or just the selected text.
For color selection, the "Hilite" button acts as a toggle: when activated, the chosen color is applied as a highlight. This allows you to quickly apply both a color and a highlight from the same menu. Additionally, keyboard shortcuts
CTRL+ALT+1(⌘+ALT+1on mac) throughCTRL+ALT+5allow you to directly apply one of the first five colors (the same as in the dropdown menu), and theCTRL+ALT+Hshortcut applies a predefined highlight.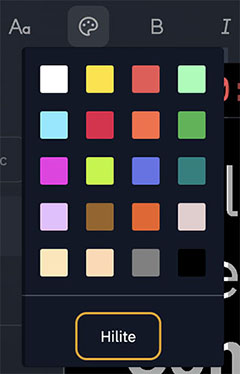
You can also remove any previous formatting by clicking the button.
Mini Editor 4
You may have already noticed that OtO provides two editing windows: the Prompter Editor Panel 2 , and the mini editor 4 . Every time you enter text in the Prompter Editor, the text is updated in the mini-editor and vice versa.
The top portion of the prompter editor displays exactly what the speaker sees on the external screen. This is the "Prompter Safe View", However, since the font size in this view is often very large, editing text directly can be cumbersome. Additionally, it’s difficult to anticipate upcoming text or get a comprehensive overview of the content. This is where the mini-editor2 comes in handy—it's a preview panel which allows you to easily navigate through the document, get an overview of the text ahead, and work on other sections without affecting the prompter screen.
When you scroll within the mini-editor, it does not move the prompter display, allowing the speaker to stay focused on their current section while the operator works elsewhere.
This secondary editing window gives you the freedom to manage the text without disturbing the speaker’s flow, providing a powerful tool for operators. Here’s how you can make the most of it:
- The mini-editor allows you to preview and navigate through the upcoming text while in prompter mode. You can scroll through the mini-editor without affecting the current position of the prompter screen, ensuring the speaker’s view remains uninterrupted.
- You can even edit the text directly in the mini-editor. However, be cautious—if you modify any text that appears before the speaker’s current position, the prompter will adjust and shift by a few lines.
- For added convenience, you can Sync (or rather “link”) the scrolling of the mini-editor to the Prompter Editor Panel by clicking the Sync button. This creates a one-way sync, ensuring that what is displayed in the mini-editor matches what is shown in the Prompter Editor panel.
When lost between the two editing panels ( 2 and 4 ), you can easiliy find your way back by selecting one or several words in the Prompter Editor or the mini-editor before clicking the Jump button 7 , OtO will find the same selection in its counterpart editor.
If you're using OtO as a presentation helper tool rather than a teleprompting tool, you can enlarge the black "Prompter Safe View" to the whole Editor Panel by setting the Aspect Ratio Setting in ⚙ Settings → General to "disable"
Rundown Panel 3
For a comprehensive overview of all the features available in this panel, refer to the dedicated chapter. In the meantime, here's a brief introduction:
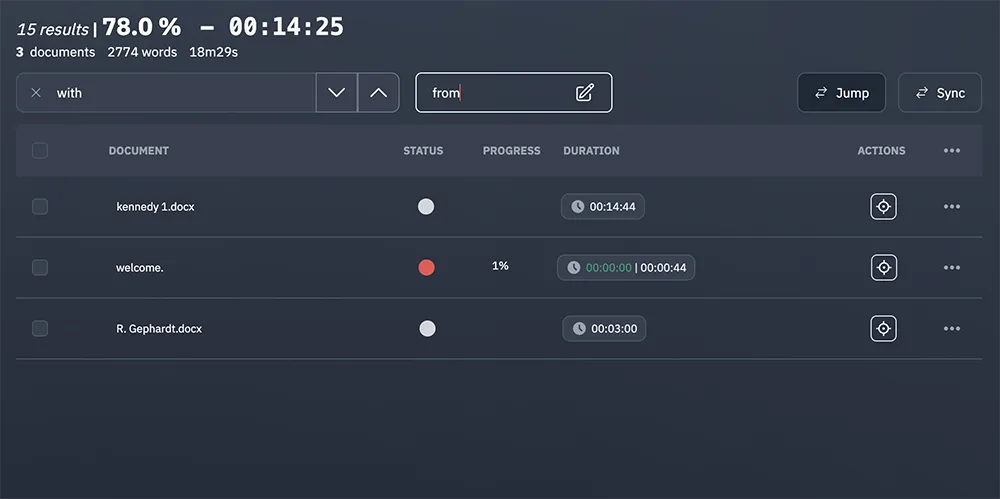
- the Rundown panel displays a list of all imported project documents.
- You can select multiple documents using the checkboxes 3b beside each document.
- The topmost checkbox allows you to select all documents at once.
- The active document (the one currently scrolling in the Prompter Editor is signaled with a red dot ).
- Notice the current document progress indicator (not to be confused with the global progress indicator)
Markers 5
For a full understanding of OtO's powerful marker system, make sure to read the main chapter and its sub-sections. However, here's a quick guide to get you started:
The Markers sub-panel 5 keeps track of markers (which function like bookmarks). You can toggle the visibility of this sub-panel by clicking the button.
- To create a marker, select a short piece of text (1 to 3 words) in either the mini-editor 4 or the Prompter Editor Panel 2 and click the toolbar button (or
CTRL+Mor⌘+Mon mac). If you create a marker on text that already has one, doing this again will remove the existing marker. - To jump (scroll) to a marker, click the button next to the marker in the Markers sub-panel 5 . This will scroll either the mini-editor 4 or the Prompter Editor Panel 2 to that marker, depending on which one was last active (the one you were actually using).
- To delete a marker, double-click the icon (this is designed to prevent accidental deletions), or right-click on it and select "Remove Marker"
Markers are a key feature of OtO, and we strongly recommend reading the dedicated chapters to fully leverage their potential.
Setting Margins and Offsets
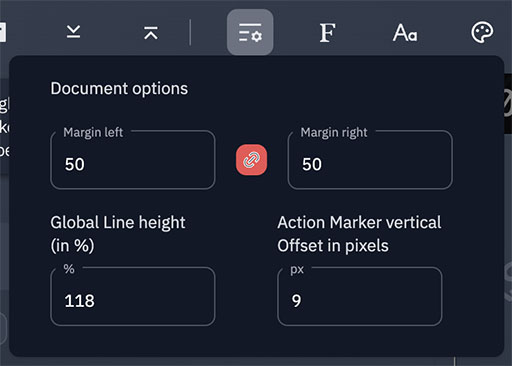
Clicking on the icon in the toolbar opens the margins dropdown which allows you to adjust the following settings across all documents within the current OtO project:
- Left and right margins (useful for adapting to screens or monitors that don’t display 100% of the image), specified in pixels.
- Line height as a percentage, to control line spacing.
- Vertical offset of Action Markers, specified in pixels.
This last parameter enables you to trigger Action Markers slightly earlier (negative values) or slightly later (positive values) based on the number of pixels you enter.
Important:
These values are saved within each specific OtO project, meaning they will not carry over to other projects, unlike a general Setting.
However, you can set default values for these adjustments by going to:
⚙ Settings→General→Default safe text marginsfor left and right margins.⚙ Settings→General→Default Font Settingsfor line height.⚙ Settings→Markers and Timers→Action Marker Vertical Offset in Pixelsfor the default marker offset.
- The
⚙ Settings→Markers and Timers→Action Marker Vertical Offset in Pixelssetting for default marker offset should not be confused with theScroll Offset ▶ cue indicatorsetting, which controls the offset (in pixels) when navigating between markers
Languages and Scripts
Alphabets:
We’ve carefully selected several typefaces with various styles to cover all teleprompter readability needs across different languages and scripts. IBM Plex and its variants support over a hundred languages and more than seven alphabets, including Arabic, Cyrillic, Devanagari, Greek, Hebrew, Japanese, Korean, and Thai. Roboto covers Latin, Cyrillic, and Greek alphabets. Additionally, we’ve incorporated Noto SC for Simplified Chinese and Noto HK for Hong Kong Chinese.Script Directions:
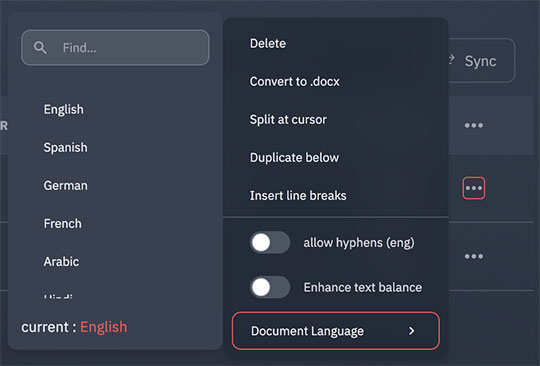
Script directionality is mostly automated. When you import a .docX document, notes from a PowerPoint, or even paste text, OtO will automatically detect whether the script is "Left-to-Right" or "Right-to-Left." However, you can manually set the script’s language by right-clicking on the script line in the Rundown Panel or clicking 3F...at the end of the line and selecting Languages, as shown below.
