Oto Basics
Prompting
Switching to prompter mode allows you to scroll the text at the speaker's pace, using either OtO's built-in tools or dedicated external devices.
Prompting Mode
- Click the button to display the prompter window.
With an actual secondary monitor attached (or any kind of display matrix switch), the window will automatically be set to fullscreen (in a conventional camera teleprompting setup for instance, this would be the screen behind or above the glass).
With no additional screen plugged, the prompter window will be displayed as a floating window on the primary screen. You could set this window to fullscreen mode, and set up, for instance, a remote multi-screen display system (see the network section)
To toggle between fullscreen mode / floating window mode, go to the Options Menu then click Toggle display fullscreen
By clicking the button (or with the shortchut
CTRL+Por⌘+Pon mac), you will switch to prompter mode, the toolbar will change its appearance, and you will no longer be able to edit the text from the Prompter Editor Panel 2 , you can still do so from the mini-editor though. Now, your task is to scroll the text at the speaker's pace!
Notice the black section at the top of the Prompter Editor Panel 2 . That's the "Prompter Safe View" sub-panel part of the text that the speaker actually sees on the prompter screen. Everything below it allows you to anticipate the upcoming text, but the speaker will not see it.
If you are new to using a teleprompter, read the section dedicated to tips for the operator. Although these tips are primarily aimed at operators scrolling text for a speaker, most of them are also suitable for solo presentations.
Mirroring & Rotation
OtO allows you to mirror and rotate your text (on the external display) to accommodate different types of teleprompter setups, such as camera-mounted teleprompters, presidential / stage prompters
You can adjust these settings directly either from the toolbar or from the menu options:
- From the toolbar: Click button to mirror the image and / or button to rotate the image upside / down
- From the menu: Click on Options then Activate Mirror Mode(ext. display) to mirror the image, and, still in Options, Rotate external display to rotate the image 180°
These settings ensure that your text remains clear and readable in any professional setup, whether for broadcast, live events, or public speaking engagements.
Prompting Speed
To adjust the scrolling / prompting speed, you can drag the blue slider next to the button. You will scroll backwards if you drag it below Zero and upwards otherwise.
You can also click on the 2 Prompter Editor panel to get it focused and press multiple times
UP↑(faster) andDOWN↓arrows (slower) of your keyboardBut don't stop there, OtO is designed to be used with multiple physical controllers. If you're the lucky owner of a Contour™ Shuttle Xpress or Shuttle Pro, you can configure it by going to Controllers Settings Panel (via Options menu then Controller Speed or
⚙ Settings→Controllers)To exit prompting Mode and go back to editing mode, just click again on the or use the keyboard shortcut
CTRL+Por⌘+Pon mac)Clicking on in the toolbar will allow you to change the left and right margins of the documents inside the current OtO projects (to adapt to any safe margins of the extenral display for instance) as well as the global line height. It's an important feature detailed in the editing section.
Configuring a Scrolling Device
OtO enables text scrolling using your keyboard, a Contour™ Shuttle Xpress or Shuttle Pro (recommended), or any compatible MIDI device like control surfaces or the worth-discovering nOb and the dark fader, or any MIDI compliant mobile app like TouchDaw.
To configure these devices, go to the settings panel (⚙ Settings → Controllers) or click on 8 .
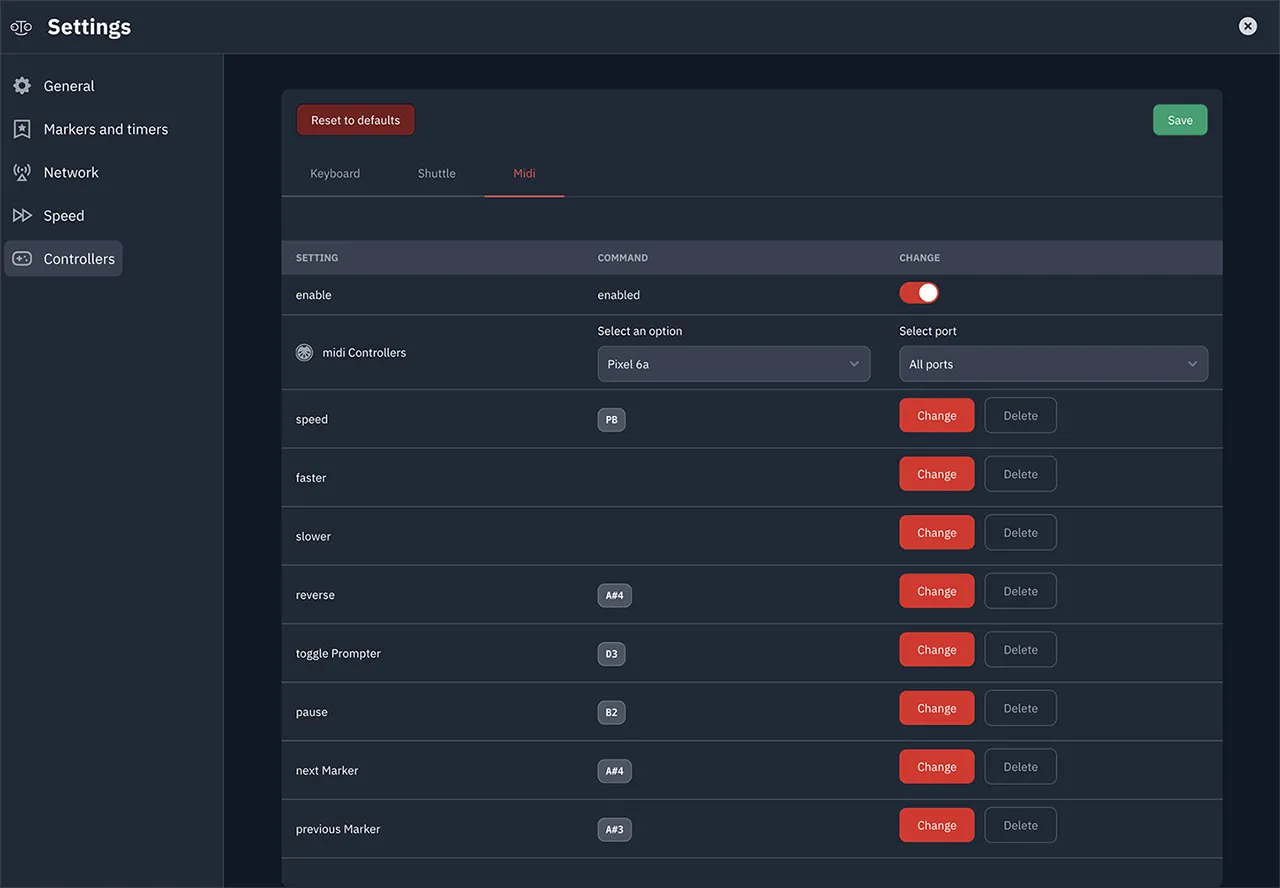
Within the three tabs—"Keyboard", "Shuttle", and "Midi"—you can adjust key/button assignments for each device.
Make sure your device is properly connected to your computer. Then, select it from the "Shuttle Controllers" or "Midi Controllers" dropdown menu. If necessary, choose the appropriate port. To assign a command to a button or control, click the Change button, activate the desired control or button, and be sure to save your settings once you're done.
Some Considerations on Scrolling Speed for Different Devices:
For Contour Shuttle devices, only the buttons are assignable; the wheel is hardcoded to control the scrolling speed.
For the keyboard, scrolling speed is controlled with two keys: one set to "faster" and the other to "slower." The more times you press either key, the faster (or slower) the scrolling becomes.
For MIDI devices, you'll likely want to assign the "speed" command to a CC controller or PitchBend. The "faster" and "slower" commands for MIDI are relatively less useful since they work with buttons, similar to the keyboard setup. It's generally better to use the "speed" setting.
A common configuration involves assigning a CC controller to "speed" and a button to "reverse," allowing you to control scrolling with just one control and change direction with a single button. Other devices like the Contour™ Shuttle Xpress or Shuttle Pro, or the PitchBend input of many MIDI devices are bipolar, meaning you can scroll the prompting window up or down with the same controller without involving a "reverse" button.

Adjusting Speed Settings
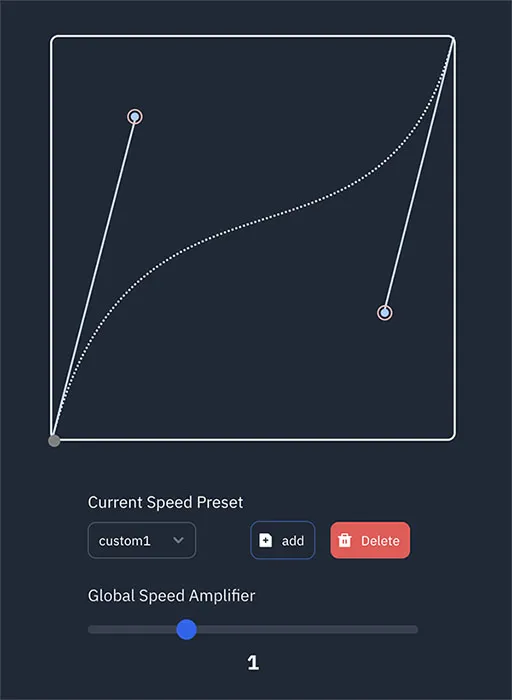
You can fine-tune the acceleration curve of your controller by going to ⚙ Settings → Speed. This allows you to, for example, have more precision at slower speeds (and less at higher speeds).
By default, four pre-configured speed settings are provided, which cover most common needs. You can view and take inspiration from these preset curves to create your own by clicking the add button. To delete a custom curve, click the Delete button (note that factory presets cannot be deleted).

You can also globally adjust or "amplify" the overall speed by sliding the control under Global Speed Amplifier.
Prompting Tips
Teleprompting may seem simple, but mastering the flow and timing is key to ensuring a smooth presentation. Here are some practical tips to help new operators:
Adapt
- The most important tip for teleprompting is the operator must always adapt to the speaker's pace, not the other way around. It's the operator's responsibility to ensure the text scrolls at a comfortable speed for the speaker, maintaining a smooth flow.
Communication
- For speakers using a teleprompter for the first time, it’s crucial to communicate this upfront. Let them know that they are in control—they don’t need to rush or follow the scrolling; the operator will adjust to their natural speaking rhythm. This helps put them and the team at ease and improves the overall experience.
Know the Script Inside Out
- Familiarize yourself with the content before the session begins. Understanding the tone, pacing, and structure of the script will help you anticipate when the speaker may need to pause, slow down, or speed up
Maintain Eye Contact with the Speaker
- As the operator, you need to monitor the speaker. Watch their facial expressions, gestures, and breathing to gauge their pace. This allows you to adjust the scrolling speed in real-time.
Start Slowly
- In the beginning, it's better to scroll slower than you think is necessary. Speakers tend to start cautiously and build up their pace. Starting slow helps them settle in without feeling rushed.
Use Shortcuts & Controllers Efficiently
- Get comfortable with OtO’s keyboard shortcuts or external controllers (like Shuttle Xpress) to adjust speed or navigate between sections. These shortcuts will save time and help you manage the flow without disrupting your focus.
Adjust Prompting Speed Gradually
- Avoid making sudden speed adjustments. If the speaker accelerates, smoothly increase the scrolling speed. A sudden change can confuse the speaker and break their concentration.
Practice Syncing with the Speaker
- Every speaker has a unique rhythm. Whether they read fast or slow, practice staying in sync with them, especially during rehearsals. This practice ensures smoother coordination during live events.
Prepare for Unexpected Changes
- Speakers often improvise or skip sections. Stay calm and quickly jump to the appropriate section using markers or scroll manually. OtO's action markers and keyboard shortcuts can help you do this efficiently.
Stay Focused Throughout
- Teleprompting requires constant attention. Avoid distractions during the presentation at all cost, as losing focus for just a few seconds could throw off the speaker's flow.
By following these tips and practicing regularly, you’ll quickly become confident in operating the teleprompter smoothly and effectively!