Markers
Network Action Markers
OtO allows you to go even further than the predefined actionMarkers discussed in the previous chapter, by enabling you to connect to any OSC or HTTP server. This allows you to trigger actions, such as playing a sound in Ableton Live® or starting a video on a BlackMagic Atem®. In OtO, this is called a Network Action Marker.
Creating a Static Network Action Marker
Let’s walk through an example to better understand how to create these custom markers.
Custom action markers function just like "regular" actionMarkers, but you need to define their specific details beforehand.
Let’s assume you want to control a Blackmagic HyperDeck using the excellent Banyan AVBridge.
According to the documentation, the OSC command to send is /hyperdeck/play-single-clip/{x}, where {x} refers to the video number in the HyperDeck.
We will first create a "static" custom marker, meaning a marker with a single command to trigger one action, for example, to play video number 2.
Note the IP
Note the IP address of the machine you want to connect to, as well as the port (the default is port 3333).
Add the New Marker
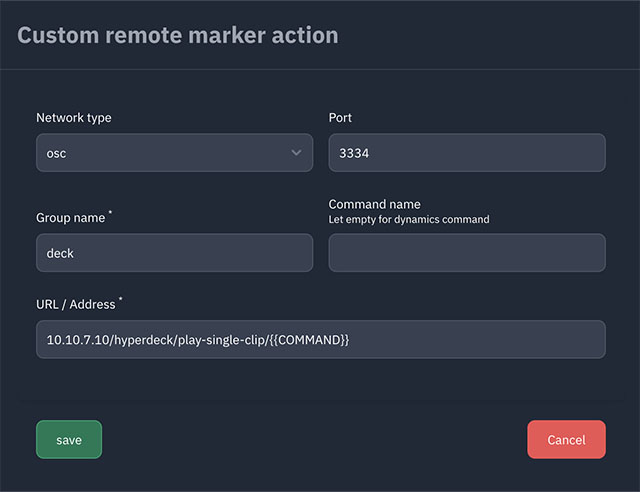
In OtO, go to the settings and click the green "Add" button. A modal window will appear with various fields:

Fill the required information
- In the "Network Type" field, choose OSC.
- In the "Port" field, add the server port or ignore the field for default value
- In "Group name" field, add something you will remember, like
deck - In the "command" field, add the actual command, which is just
2(the video clip we want to trigger)
Address/Command configuration
In the "URL / Address" field, enter the following:
10.10.7.10/hyperdeck/play-single-clip/
(Replace10.10.7.10with the IP address of the remote machine. You should see in the Network Setting Window a new entry below the green add button with a reference to the maker we just created (note the trash and pen icon, to respectively edit or delete the marker)
Create Marker
Next, create an actionMarker as we discussed in the previous chapter (select one or more words, then press the or use
CTRL+Mor⌘+Mon mac).Save
Rename it to declare it as an actionMarker, using the syntax group:command. For our example, it would be:
/deck:2
We should now be able to trigger our shiny all new actionMarker, as a command that sends the previously defined OSC command to the Blackmagic HyperDeck. When triggered during your presentation, this marker will play the designated clip on the HyperDeck.
Creating a Dynamic Network Action Marker
If you have many videos or events to trigger, it can quickly become tedious and inefficient to configure in the settings panel a new marker each time. In this case, you can create a dynamic marker.
Let’s go back to the example of video clips triggered via the address /hyperdeck/play-single-clip/{x}, where "x" can be any number (as long as the video exists in the HyperDeck).
We will do the same on our side.
The creation process is identical to static markers, so follow the steps up to step 5:
Leave the "command" field empty (since the command is dynamic and will be interpreted at trigger time).
In the address field, enter:
10.10.7.10:3333/hyperdeck/play-single-clip/{{command}}
Here,{{command}}acts as a placeholder, just like{x}in Banyan AVBridge’s documentation, allowing for a variable value.Save, and you can now quickly create as many markers as you have clips by renaming them, for example,
/deck:2,/deck:3, etc.
This setup makes it easy to handle multiple dynamic events without needing to manually define each action in advance.
HTTP SERVERS
http servers work the same way, they're just more customizable since http is a more generic protocol. If you need to connect to an http server, you'll need to refer to the documentation of the server you wish to connect to check what method (POST or GET) is required. You can add headers and body information with a JSON syntax (check the placeholders to get an example of how those should be formatted)
Advanced options
In the intro chapter on action markers, we saw that it was possible to refine a command by specifying an option in parentheses.
For example, the marker /midi:e2(120) sends the MIDI command (a note, in this case) E2, and refines this command with the number in parentheses. In the context of MIDI Action Markers, this option is used to specify velocity.
In the network Marker creation panel seen above, the placeholder corresponding to this "option" is written as {{option}}, just as the placeholder corrsponding to the e2 note/command is written {{command}}.
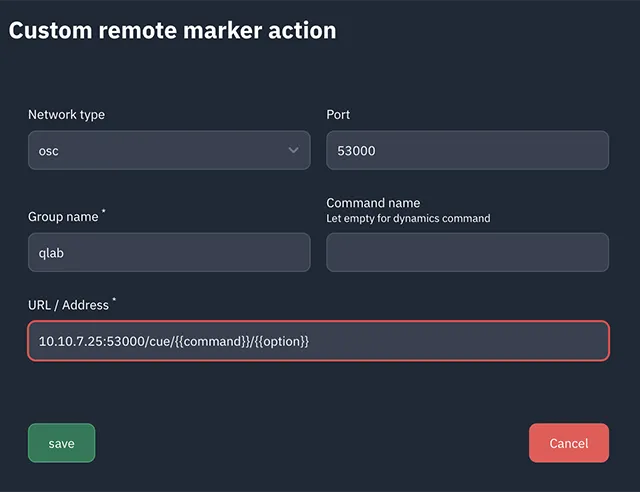
Let’s take the example of Qlab, a well-known Mac-based show control application that supports the OSC protocol. Suppose Qlab is configured to listen for network requests at the address 10.10.7.25 on port 53000.

If we create a Network Action Marker with the address /cue/{{command}}/{{option}}, then:
the marker /qlab:2(play) will actually send the command /cue/2/play
and the marker /qlab:3(stop)will send /cue/3/stop to Qlab
This allows for flexible and dynamic control over external applications, adapting commands on the fly based on the marker’s name.