Oto Basics
Rundown Panel
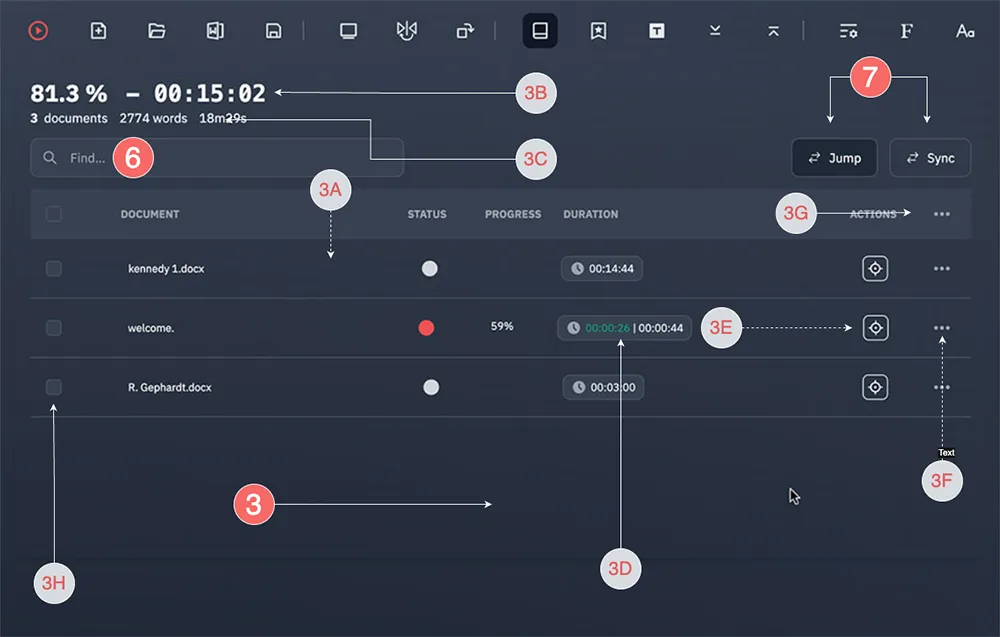
The Rundown panel displays a list of all open documents and offers a variety of features for each document individually or for all documents collectively. It serves as a sort of toolbar for document management.
Rundown Panel overview

- You can select multiple documents using the panel checkboxes The topmost checkbox selects all documents.
- The 3F
...dots at the end of each document line open the document tools, a collection of helping features on a per-document basis - As for the TOP 3G
...dots, they open the global document tools menu that allows you either to trigger actions for all selected documents or actions not related to any specific document (like AI powered text corrections, global .docX export etc.) - The status button becomes red when the document is active (meaning, the actual currently scrolling document on the prompter screen)
- You will find two progress indicators: one for the active document 3B and another one for the overall progress 3C (corresponding to the entire rundown), located above the search field.
- Under the duration column title, you'll find a small "widget" 3D which displays duration related metadata. Click on the little clock icon, the widget will now display the wordcount of the document, and the cumulative wordcount if several documents are opened. Click again to get the cumulative time.
- The 3E button at the end of the line will directly scroll the Prompter Editor Panel to the beginning of the document
- You can reorder the documents by drag and dropping them (click and hold any empty zone around the document title, you will see the mouse cursor become a hand, now drag the line before or between another document)
- Finally, at the very bottom of the rundown panel 3G , you’ll find, from left to right, the total number of documents in the rundown, the project title, and the current timing displayed alongside the total timing.
Document Tools
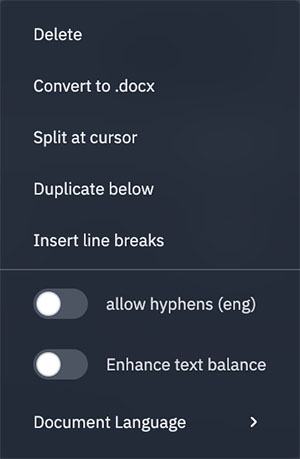
The document tools menu, accessible by clicking on the three dots ... at the end of each document's row (or with a right click on the row), offers a variety of useful options. While most are self-explanatory, here are some detailed explanations for a few of them:

- Insert Line Breaks: Adds line breaks after most punctuation marks to improve readability, especially with larger font sizes.TIP
While the Insert Line Breaks algorithm works well in most cases, it's important to proofread the text afterward. Some punctuation may be misinterpreted, causing unwanted line breaks.
- Split at Cursor: Splits the text at the cursor position, creating a new document from the second half.
- Merge: First select two or more documents, and they will be merged into one
- Allow Hyphens: Activates dynamic hyphenation without altering the actual text. The hyphenation reflects the document's language, which can be manually adjusted if incorrectly detected. You can turn off this feature at any time without needing to reformat the text.
- Enhance Text Balance: Activates the "Balanced Text" mode, which prevents widows and orphans (e.g., single short words on a line), restructuring the overall text for improved readability. Like hyphenation, this feature doesn't alter the actual text and can be toggled off without reformatting.
- Document Language: Allows you to manually change the document's language to optimize hyphenation and improve AI-powered features (see below).
Network Mode & Text Formatting Features
Please note that when Network Mode is active, the options Enhance Text Balance and Allow Hyphens will be disabled. This is because the rendering of these features heavily depends on the display settings of each individual computer, which could cause inconsistencies across devices.
Global Document Tools
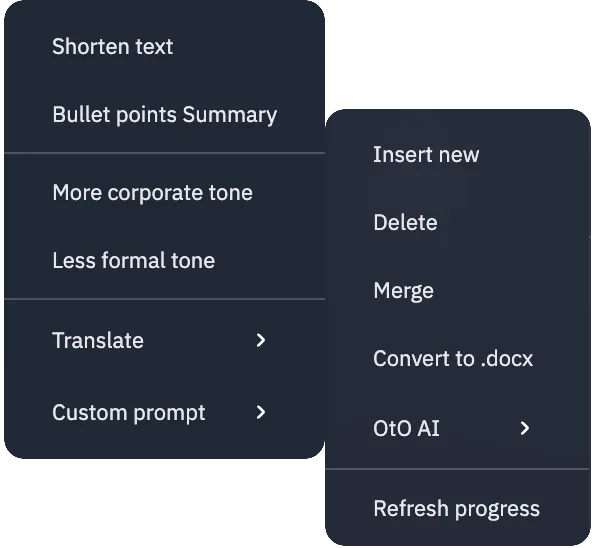
The global document tools (accessible via the three dots ... at the top of the Rundown panel) allow you to perform actions across the entire document set:

- Insert New: Inserts a new document at the top of the list.
- Delete: Removes all selected documents.
- Language Detection: If the language is not correctly detected, you can manually select the language at the bottom of the same dropdown menu (see below).
- Convert to docX: Converts all selected documents into a single Word file.
- OtO AI: Opens a submenu to apply a generative AI model to the currently selected text (the AI applies to a portion of selected text within either editor 2 or 4 ).
- This submenu includes "preset prompts" optimized for teleprompting / cue-based talks. There is also a custom prompt where you can enter any transformation that will apply to the selected text.
OtO AI Configuration
In the ⚙ Settings panel under the "General" section, you can modify the type of AI model you want to use.

- Local Model: If you want to use a local model, first select "Local model" under the "AI provider" option. Then, in the line below, browse for a compatible
.gguffile. You can find an up-to-date list of such models here. - Remote Model: To use a remote model, you can choose between OpenAI (OtO will use the Chat-GPT Turbo 3.5 model by default, but you can choose any available model in the remote AI model field) or MistralAI ("Mistral-small-latest" model by default).
- You will need an active API subscription to either Mistral or OpenAI to access remote models. Simply enter your API key in the required field.
OtO Local AI configuration
OtO can integrate artificial intelligence models, such as those provided by OpenAI or Mistral, if you have an API key. Aware of the sensitive nature of many documents used in a professional tool like OtO, we also offer the option to use an offline model, which you can download yourself.
You can use any model that follows the GGUF specification. However, we recommend using smaller models quantized to 4-bits for optimal performance, as larger AI models may negatively impact your machine's performance. Regardless, to run even a 4-bit model, your machine must meet at least the following specifications:
To run a 4-bit quantized version of a 7-billion parameter model like Mistral on a PC or Mac, the minimum recommended specifications will primarily depend on your use case, including inference speed, memory management, and hardware optimization (GPU vs. CPU). Below is a detailed breakdown of the minimum requirements for efficient performance: Here are the minimum recommended specifications for running a 4-bit quantized 7B model like Mistral
For PC:
- CPU: Recent x86-64 processor (Intel/AMD)
- RAM: 16GB
- GPU (optional for faster performance): NVIDIA GPU with CUDA support (e.g., GTX 1650 or better)
- Storage: SSD (for faster model loading)
For Mac:
- CPU: Apple Silicon (M1/M2) or Intel Mac
- RAM: 8GB (16gb recommended)
Using a GPU is optional but can significantly speed up inference, especially for larger prompts. These specs will offer a faster and smoother experience when running inference on quantized models.